First ever Shake Shack!

MMMM..HMMMM…

I can’t believe I’d never tried Shake Shack before last weekend. We’d always heard amazing reviews from others, one person even told me that it was preferred to burger joints in the States including In and Out Burger – I mean an American chain in the UK that does better burgers than in the USA?

Hungry and craving a treat as it was Saturday, we decided we’d travel into Central instead of being lazy and letting the rain keep us indoors – shocking for me, as I’m a sucker for saying in the dry. Well, Deliveroo is always a good option when it’s horrible outside. 

Shake Shack Covent Garden

Covent Garden was pretty busy, as expected being a tourist hot spot, but as we got to Shake Shack the guy looking after seating customers told us how it all works, letting us know that once we’d ordered it would only take approx. 10 minutes for the order to be ready! Yes, only 10mins!

For all you Shake Shack virgins like I was, here’s how to master the Shake Shack way of burgerness – You have to go inside to order and you’re given a buzzer which will flash when your order is ready. Whilst you’re waiting for your order to be ready, you go outside to the seating area and wait to be seated, which doesn’t take long at all…I think we were only waiting 2 minutes. You then wait at your table for your buzzer to flash at you like crazy before going to the collection window where you’re passed a tray holding your order – Easy Peasy! Condiments including hot sauce, mustard, mayo and ketchup as well as napkins and plastic knives are on the way into the seating area so don’t forget these.

I chose a Shackmeister Burger (beef patty, shackmeister sauce and crispy shallots) and peanut butter shake, whilst Alex went for the cheeseburger with bacon and lettuce, and a caramel milkshake.

The wait was just as we were told, not long at all, so we were soon indulging in the most incredible burgers.

Shake Shack Covent Garden

Shake Shack Covent Garden

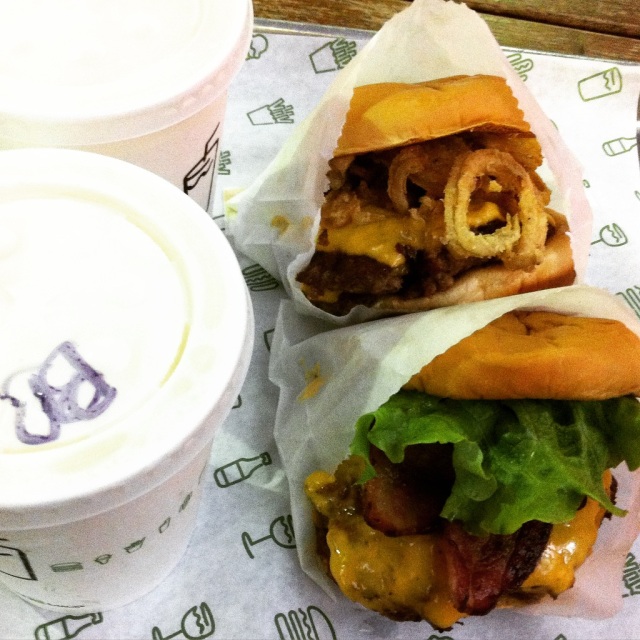
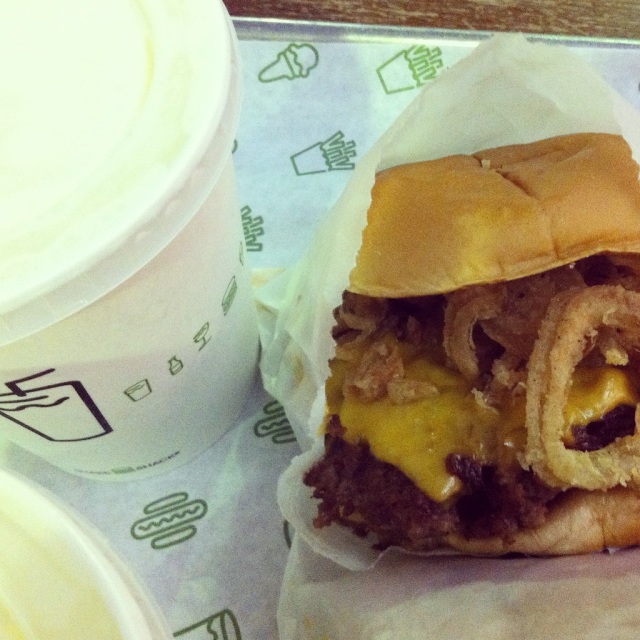
Juicy and tender, moist with melted cheese and the softest buns, the burgers went so well with crispy bacon or the crispy shallots. I dipped in American mustard, a must have with burgers for me, whilst Alex totally disagrees, enjoying his stack of heaven with ketchup.

The shakes were just as good. I definitely preferred my peanut butter shake, although Alex thought it was a little bit sickly. Both were really tasty, quite thick, really creamy and just the right size. Pretty filling though so bare this in mind.

We didn’t get any fries, although the burgers were that good we might have popped back to the tills to get another to share…how naughty were we? Just to good to resist.

I think this has to be the best burger I’ve had so far, nothing else quite compares.

We’ll  be going back for more that’s for sure. Don’t know what I’ll choose next but I definitely want to try one of their concretes (a frozen custard with mix-ins which you eat with a spoon), I’ve already spotted the Concrete Jungle on the menu, which has marshmallow sauce, just my type of dessert!

Have you been? What would you recommend I go for?

Chloe xx

The BEST Mince Pies…

I’ve currently had only 2 mince pies this year, but I sure don’t think this makes me any less of a master in the mince pie field. I do love a good homemade mince pie and always have!

This weekend just gone I went home for a mini christmas with my family (I’m spending xmas day in London with my boyfriend this year), and had a christmas lunch with my closest family before everyone came round in the evening for snacks and drinks.

My granddad and his partner brought a homemade sausage roll and some mince pies. I couldn’t quite manage a mince pie after our feast at lunch but I made sure I packed one to bring back to London.

This lunchtime I warmed it up (ok, in the microwave so definitely not as good, but I couldn’t wait until I got home to use the oven) and indulged.

It was insanely good. It had been baked with marzipan in too – Have you ever had one like this? It was sweet and went so well together – the marzipan wasn’t too over whelming either, just the right amount. I can’t believe I’d never had one like this before!

Unfortunately I was too hungry and excited to think about pre-cooking photography…sorry! But look at it when cooked…

mince pie

mince pie

mince pie

I think this could be one of the best mince pies. Loved it so much I had to share!

If you’re making homemade mince pies this year I would recommend this little sneaky addition, courtesy of my granddad and his partner, to impress your guests!

I hope you enjoy as much as me!

Chloe xx


Christmas Gifts: Homemade Treats – Coconut Ice Recipe

I love to give a little something homemade for christmas, I think it adds the perfect personal touch. Plus, after all, gifting is all about the thought which goes into it, and what’s more effort than making gifts?

This year Ally and I teamed up, had a girls night in and got making, cooking and setting – It’s always nice to have company when doing things like this. With christmas music on in the background we got stuck in.

We decided on 3 things to make all together which I thought I’d share with you. They’re great and relatively easy to make, and are lovely gifts!

First recipe: Coconut Ice

We used the recipe from Good Housekeeping which my Grandma had actually kindly recommended. It was a no bake recipe and says the end product can be kept for up to a month! Perfect for early preparation.

What’s better here is your ingredients list:

Coconut Ice Recipe Ingredients

  • 405g tin light condensed milk
  • 300 (11oz) icing sugar, sifted
  • 300 (11oz) desiccated coconut
  • Few drops red food colouring (or a tiny amount of red food colouring paste)

So few ingredients! It’s super easy to make too.

1. Start by lining a tray with baking parchment which you will use for coconut ice to set. They recommend a 15cm x 20.5cm (6in x 8in) tin, however I just used a rectangular tin I had available. Put this to the side.

2. Take a large bowl and mix together the condensed milk and icing sugar. Stir in the coconut.

Coconut Ice recipe

3. Put half of the mixture into the tin and smooth out.

Coconut Ice Recipe

4. With the rest of the mixture in the bowl, add the colouring and stir until you reach an even colour of pink. Layer this on the white mixture in the tin and press on top.

Coconut Ice recipe

Obviously I needed to keep going after taking this pic 😛 Needed to rest my arms…pretty stiff to stir.

5. Cover and leave overnight to set before cutting into squares.

I did put a bit of vanilla essence in mine, not too sure why but it tasted nice!

I then used cellophane to wrap my coconut ice, gathering at the top and tying with festive string… 

Coconut Ice packagingLook how cute they look!

They’re so easy, pretty cheap and look great! If you’re looking into making a last minute gift this would be perfect!

Have fun.

Chloe xx

P.s. Fudge recipe to come 🙂

Pop-Up Baking Boutique Masterclasses – Brick Lane

I wrote not too long ago about wanting to get better at baking and the pop-up boutique which was coming to Brick Lane (read post). Well it’s here!

Thursday night I was lucky enough to be invited to the launch – an evening of mingling and learning new techniques from Juliet Sear – cake and baking expert, author of The Cake Decorating Bible and Even Better Baking Ambassador.

The Pop-up is reasonably easy to find, it’s located at 12 Drays Walk, Brick Lane but it’s inside Ely’s Yard – the same place as the ZICO Smoothie pop-up.

I turned up at 6.30pm and was greeted by Lucy (one of the team behind the running of the Dr Oetker Baking Boutique). She invited me in, offered me a drink and I started talking to one of the brand ambassadors about the boutique, the layout and what they had on offer.

The Dr Oetker Beter Baking Boutique is set out over the two floors of the shop. On the lower level one wall had all the products which are available to buy, as well as a till area, and a wooden table in the centre with baking equipment on to help create the atmosphere. This is where most people were crowding to mingle and network.

photo 1
I loved the wall on the left as you walk in – a huge wall which asks you questions and directs you to the chocolate you would most like. I know, all chocolate right? But this was really cool!
photo 2-1
Upstairs is where they hold the masterclasses, with a big work bench where all participants can be seated around the outside with the person holding the masterclass on the other side for demonstrations.
photo 4-1Upstairs also had a board where everyone could post their favourite baking tips – I thought this was an awesome idea too! A great way to share knowledge and learn a few cool tricks or new twists.
Notice Board - Baking Tips

These are my favourite ones…
photo 1-6
photo 2-6
photo 4-6
photo 3-6
photo 5After browsing all the amazing tips, I spoke to a few people attending the event as well as those helping to run the pop-up.

A short while later we were all invited to go up and take a seat for Juliet to start her masterclass.

She opened with telling us a bit about herself and that she made Fearne Cotton’s wedding cake!! Just WOW! 

She then went through a few different techniques – making icing roses, robin cupcakes, snowman cupcakes and pigs. She went through the different designs step by step, allowing us to answer any questions we had and giving us some really good tips on how to make the best!
photo 2
photo 2-2

photo 3-2Cutting the icing to make her sugar rose

photo 4-2

Using the plastic wallet to squash her petals for the rose

photo 5-1

Putting the rose togetherphoto 3

Juliet icing on top of a fondant topped cupcake

We then all got chance to decorate and experiment ourselves, using the techniques Juliet had shown us or to freestyle…I’ll let you in on the rose technique too…

photo 3-5

photo 5-3

Juliet going around the room helping with any queries or questions people had as they worked on their pieces of art 🙂

So here’s the inside information on how to make a rose…

Roll a ball of fondant into a sausage and cut into sections. You’ll need about 6. Make sure your surfaces have a light layer of icing sugar to stop sticking!

photo 3-3

Using a plastic wallet (yes from the stationary section), cut down the side and along the bottom, place the pieces inside with enough space between them.

photo 4-3

 Cover the pieces of icing with the other side of the wallet and use the base of your thumb to squash the circles. Then use your finger tip to smooth one side of every petal – this will form the delicate curved edge which looks like the outside top edge of the petal. (Photo below doesn’t have the smoothed off edges)

photo 5-2

 Open the wallet and peel the first petal off. Carefully stretch the first one out, roll the one side back a tiny bit. Roll the first one to make the centre piece of the rose. Start attaching petals to the outside, overlapping the last petal and each petal added being slightly higher, the thinner edge being on the top – the petals slightly curving outwards, like a rose would. You should keep going until the rose looks even all the way around.

photo 2-4

I then iced a cupcake with Dr Oetker cupcake icing to attach the rose.

photo 3-4

photo 4-4How cute does this look? They’d look awesome if you used the Dr Oetker shimmer spray over the top too! Slightly wishing I had done this too!

I also made a robin cupcake with the Dr Oetker chocolate cupcake icing, coloured fondant and the black gel colour for the pupils.

photo 4

I really liked this one! I think I’ll definitely make these again!

I also did a bit of free styling on my last cake. It was so much fun getting to try out the different products, tools and have the help of Juliet’s tips too.

Everyone’s cupcakes looked amazing! Looking around the table it seemed everyone else was having so much fun too. There were some really cute cupcake designs.

At the end we got to take our cupcakes home…

photo 4-5

I said goodbye to all the lovely people I’d met, and left with a goody bag with a few Dr Oetker bits and pieces in – Excited to use these!

I didn’t buy any of the Dr Oetker range whilst there the other night, but I will definitely be going back to purchase baking goods before they close. Their products are awesome, they make decorating interesting and so much fun and some of them even help make things easier & better!

I will be putting my new found tips and skills to work this christmas with presents and events, so keep an eye out. I have no excuse not to get back into baking!

What Dr Oetker products have you used? Which are your faves?

Chloe xx

DIY FroYo @ Samba Swirl

This is my favourite frozen yoghurt shop! Actually my favourite treat when I’m out full stop. Or if I have a froyo craving after dinner, at the weekend or any other time I’m chilling at home or the boyf’s.

I know it’s not the cheapest option, and you can get pots for cheaper to eat at home. BUT this is worth every penny!

So this weekend me and my housemates ventured to the Northcote Road store for a bank holiday treat – my recommendation, and the experience resting on me.

20140507-134442.jpg

We got in and were asked if we’d been before by the shop assistant (They’re so helpful!). Me being a Samba Swirl Expert (Yes I like to think so!), let her know we were all fine, as I’d already briefly explained to the girls the ‘Samba Swirl How To’ – It’s not as hard it sounds, and it’s so much fun!

Picking up a pot each, we started.

The Frozen Yoghurt is in machines on the one side – a number of different flavours which are self-serve. The flavours change daily and you can keep up with when your fave flavour is out via their twitter (@SambaSwirl). I didn’t get a pic of these, but if you’ve ever been to pizza hut and used the ice-cream factory, it’s similar to that.

The toppings are self-serve too. There are SO many. Different fruit, chocolatey bits, snickers, brownie, caramel shortbread, oreo. And there’s even more in the twist open jars in the walls too – flaked almonds, walnuts, mini eggs, marshmallows and the list goes on! So many choices! And then there are the sauces too, and fruit coulis.

This is why it is sometimes best to choose your toppings before putting frozen yoghurt in your pot – you don’t want a melted, soggy mess! But having already warned the girls about this, we were prepared!

20140507-134518.jpg

20140507-134530.jpg

20140507-134507.jpg

My lovely housemates deciding on toppings from the jars in the walls.

You pay per weight, so keep this in mind, but once you hit the ‘Max-It’ (£6.95) you can put as much on as you want – as long as it doesn’t go over £12 worth I think it was.

I had pistachio flavoured frozen yoghurt and some dulce de leche frozen yoghurt too, topped with fruit, fruit coulis and some chopped nuts – nice and healthy!

I couldn’t believe that mine looked less than my housemates pots and yet mine was the only one to hit the ‘max-it’! devastating! But the lovely shop assistant informed me I could add a little more if I wanted to. So I carried on adding more 😛 an extra flavour frozen yoghurt (Pomegranate and raspberry) and some mini eggs (Perhaps not so healthy anymore, BUT this was breakfast and lunch after all ;)).

20140507-134541.jpg

We sat outside on the tables in the sunshine, enjoying our delicious concoctions. The girls loved theirs too – I made a good choice for our bank holiday treat! We all left very satisfied – Thumbs Up from all!!

My SNOG experience (Frozen Yoghurt Shop)

This week I took a trip to SNOG in Angel. It was amazing. Not only is it pretty healthy but there’s so many choices and it feels like you’re treating yourself!

You walk into the shop. It’s nice and clean, and really warm…definitely nice when coming in from outside at the moment!

20140223-162000.jpg

You head towards the counter and suddenly get overwhelmed by the options – there’s so many.

If you’ve never been before the person behind the counter kindly explains the menu and recommends what they thinks best – which I think is fab!

You have to choose the flavour frozen yoghurt, the toppings and the sauce. It can be as healthy, or as much of a treat as you like.

We seemed to go for a balance – fruit and brownie. The brownie was even gluten free, so perfect for Jen! But we did have chocolate flavoured frozen yoghurt and caramel sauce. We shared one, as they are a reasonable size and we were being naughty eating before dinner! I know…tut tut.

Heres a pic of our SNOG:

20140223-162015.jpg

I love the little quotes on the pots too!

We sat in the shop to eat our delicious creation and watched quite a few people come and go. It seems to be a pretty popular and I can tell why!

I now have cravings for frozen yoghurt whenever I think of having something sweet – it’s gotta be better than cravings for ice cream though!

This is definitely going to be turning into a regular place to visit when I’m out. My sisters down next weekend, and she’s already wanting to go – perfect excuse for another snog! I wonder what toppings I’ll have next time…hmmmm….

Super berry smoothie

Me and my flat mate Claire made berry smoothies as a treat. It tasted amazing after my run, and i felt like I really deserved it, even though it is made with fat free natural yoghurt anyway…but it tastes like such a delicious dessert!

20140216-220556.jpg

Recipe to make two:

200g frozen berries
200g fat free natural yoghurt
Milk – we used semi-skimmed this time, but I used skimmed before (the amount depends on how runny you want it)
Honey (optional, to add a bit more sweetness)

What to do:

Put the berries and the yoghurt in a blender and blend.

Add milk a bit at a time and keep checking the consistency – keep adding milk until it is runny enough for you liking

Give it a taste. If you think you’d like it a little sweeter, add a teaspoon of honey and blend again.

I think they’re served better with a straw, but if times are hard and the shops are out or even worse they’re closed, then I think it can be managed without. Just that little extra to make it perfect 😉 (I didn’t have a straw this week, and it still tasted delicious!)

Fancy shaking it up a little? :

Some recipes say you can add oats – this would make a great breakfast, and you can add other fruit too such as bananas. Get creative!